Teacher’s Advanced Preparation for Labs
Project
Description | Overview & Objectives | Teacher Prep | Protocols|
Useful References
Equipment, Sources, and Timeline


Before Starting
Students will be more engaged and successful with this project if some groundwork is done first. Getting familiar with salmon issues, learning about watershed health, visiting local streams and learning about the status of salmon in your area would be great starting points. Some previous lab work involving pipetting and running gels can make a big difference too. Probably the single biggest problem in achieving success with the experiments is improper pipetting- either using the wrong size pipettor, or setting the pipettor to the wrong number. So the more practice you can do beforehand, the better. Some background in cell and molecular biology and also population genetics, Hardy Weinberg, and evolution would be helpful. Have your students read the excellent article, "Preserving Salmon Biodiversity," by Phillip S. Levin and Michael H. Schiewe available online at: http://americanscientist.org/articles/01articles/Levin.html (American Scientist: Vol 89, #3 (May-June 2001), pp. 220 - 227). Another great book is Upstream: Salmon and Society in the Pacific Northwest (1996) by National Academy Press. It is also available online at: http://www.nap.edu/books/0309053250/html/ (check Chapter 6 in particular on Genetics and Conservation). Also, do the Powerpoint presentation (see our homepage) with your students. Check through our website thoroughly- there's lots of information there for you to use.
Where to get samples?
In the past, Project GROWS has provided teachers with salmon tissue that was donated by state and federal agencies (National Marine Fisheries Service and Washington Department of Fish and Wildlife), and hatcheries. You can contact Dr. Peter Wimberger at wimbo@ups.edu to find sources of tissue, or you can find your own source. Collecting your own tissue can be a great way to create more ownership for your students around this project. Kids get excited about the data they generate for "their fish" (even if it's just a tiny piece of fin), and they'll be even more excited if they helped collect the tissue, or if they know it comes from nearby waters. Perhaps the simplest way to get enough tissue for a first-time through this curriculum with your students is to approach the manager of nearby hatchery. Often they have questions about genetic differences between stocks that they would like answered. You can also establish connections with state, tribal or federal agency researchers working on salmon. The following website will provide contact information for a hatchery near to your school (in Washington state). http://www.wa.gov/wdfw/hat/facility.htm#Facility.
DNA Extraction
The
easiest tissue to collect from fish are small pieces of fin. Liver, heart and muscle tissue also yield
DNA. Each student (or student group)
should be given a small piece of tissue (about this size: Ñ ) in a 1.7 ml eppendorf tube. This small piece of tissue should provide
plenty of DNA for PCR and restriction digests.
If we have provided you with the tissue it is probably in ethanol, which
will need to be removed before proceeding.
You can do that just before extracting by rinsing the tissue in
distilled H2O before beginning the extraction protocol.
For
DNA extraction we recommend the Qiagen kit (QIAamp Tissue Kit. For free
50-sample kit, call Sonya Dobias at 1-800-426-8157 Ext. 23544). This kit is the fastest we have found, and
yields good results. We have also used
the “GenomicPrep Cell and Tissue DNA Isolation Kit” (Pharmacia Biotech) with good
results. Both of these kits have the
advantage that they avoid the use of organic solvents such as phenol and
chloroform and thus are safe in the classrooms.
During DNA extraction, cells are lysed and proteins and other cell constituents are separated from the nucleic acids. The Qiagen kit uses a salt extraction buffer and ethanol, and then spin columns to isolate the nucleic acids. It is not necessary to get rid of RNA that may be extracted along with DNA.
To
visualize the extracted DNA, run 10 ul on a 1% agarose gel made in running
buffer (recipes). Gels made with TBE
can be run at higher voltage, thus faster. Stain the gel
for 30 minutes with ethidum bromide or SYBR green (see Equipment,
Sources, and Timeline), then rinse with water, and put on UV light
box.
Polymerase Chain Reaction (PCR)
During PCR the class will amplify a specific region
of DNA that they will then digest using restriction enzymes. The quickest and most efficient way to carry
out PCR is by using a kit like the Ready-to-Go
PCR Beads by Pharmacia Biotech.
This kit provides small dried beads; each bead contains all the
necessary reagents for doing a 25 ml PCR reaction. All one needs to add are primers, template
DNA and water. The advantage to using
these types of kits are that more reactions will be successful and they are
easier to set up. The disadvantages are
that students don’t see all the separate components included in a reaction and
they are significantly more expensive than mixing your own PCR cocktail. If you don't use the beads, it might be
advisable to premix the reaction components for the students to 1) increase the
success of the reactions and 2) reduce the chance that the reagents get
contaminated. We have had good success using Qiagen's Taq (they will probably
send you a free sample! (click here for
sources) and Amplitaq from Perkin Elmer. (Click here for reaction
components). You can incorporate
an exercise where students figure out what they would need to include to make a
reaction with all the reagents at the proper concentrations.
This year the gene that many classrooms will amplify is Gonadotropin II b subunit (GTH2b), using primers designed by Paul Moran, Linda Park and colleagues at National Marine Fisheries Service (Moran et al. 1997). This gene is one of several that can be used to genotype chinook salmon using PCR and restriction digests. When PCR-amplified with certain primer pairs and digested with certain restriction enzymes, each locus possesses at least one variable restriction site; thus there are at least two sets of restriction fragments that can be distinguished as distinct alleles (usually two alleles, sometimes three- click here for schematic of various loci.
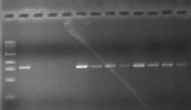
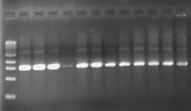
Note: Due to a considerable amount of variability in the success of PCR reactions, we are now routinely doing a second PCR reaction with each sample using a second set of primers which are just inside of the first set of primers. In this procedure, 2 ul of the completed first PCR reaction is used as the DNA source for the second reaction containing the inside set of primers. Although this adds a bit of time to the procedure, it greatly increases the likelihood of success of generating enough of the desired PCR product for genotyping. The following photos illustrate the positive effect of the second round:
First Round PCR Second Round PCR
(gonadotropin gene) (same samples!)
Project GROWS will supply primers
and PCR beads or Taq polymerase for your classroom this year.
Primers are relatively cheap ($20 – $40 each depending on the supplier
for a 200 ng supply that will last years).
Paul and Linda and their colleagues have determined that for many loci, very
little primer makes the PCR reaction work best. We recommend that the primers be diluted to a concentration of
0.25 pmol/ul and that each PCR reaction gets 1
ul
or 0.25 pmol of each primer. We will use 2 ul
of template DNA (about 100 ng) per reaction. For different thermal cyclers and for
different loci and different species new optimum concentrations have to be
empirically determined.
The following general profile for the Perkin Elmer 2400 Thermal Cycler works well
for both the prolactin2 and gonadotropin loci (the optimal cycling profile for a given locus and thermal
cycler will vary and must be empirically determined): Click here for more
information about the gonadotropin locus.
Initial denaturing: 1
cycle at 95O C for 2 minutes,
followed by
Denaturing,:
35 cycles of: 95 O C for 15 seconds,
Annealing: 54 O C for 40 seconds (varies for other loci-),
Extension: and 72 O C for 1 minute and 20 seconds
Final extension: 72 O C for 5 minutes.
Hold at 4 O C (if desired – not necessary).
Troubleshooting
PCR (short and sweet)
Adding a
second round of PCR as described above should eliminate many of the difficulties
to obtaining PCR product. However, if you want to try to optimize the
reactions using only one round of PCR, or if you are still having problems even
after doing two rounds of PCR, here are some suggestions. You will
sometimes find that you get no amplification (no bands) or non-specific
amplification, meaning that you have multiple bands. For multiple bands, increasing the temperature of the annealing step
and decreasing magnesium concentration may help. Sometimes decreasing the amount of starting template or reducing
the concentration of the primers will reduce non-specific amplification as
well. For instance, if one doubles the
concentration of primers used for GTH2b, multiple products will become
evident. We have found that for many of
these loci, multiple bands can be reduced by reducing primer concentration.
If you see no band or a very light one, you might try increasing the amount of DNA added. We have found that the amount of DNA obtained from Qiagen extractions varies from about 25 ng/ul to nearly 200 ng/ul, depending on the type of tissue and how much is used in the extraction. If you are at the low end of the DNA concentration range, you might need to add more to get a strong band. Other potential fixes are to increase the number of cycles, increase your extension times, or lower the annealing temperature.
When your
amplification doesn’t work, you can make sure that your reagents are good by
running a positive control. The
Pharmacia kit provides a positive control that you can run along with your
samples. Lowering the annealing
temperature or increasing the magnesium concentration in the reaction reduces
the stringency with which the primers anneal.
Thus, if the non-amplification is the result of a lack of specificity
between the primers and template, these measures will increase your
success. Increasing primer
concentration may also help. We also
HIGHLY recommend running a negative control in addition to a positive
control. The negative control is used
to make sure none of the initial reagents you have used are contaminated with
DNA. Running these controls provides a
great teaching tool to think about controls in experiments and to think about
what happens during PCR.
We realize that the time that you have for GROWS may be limited, but unfortunately PCR can sometimes be finicky. We have found that failed PCR reactions sometimes provide the best platform for teaching students about doing research. If students have sufficient background in PCR and a little time, they can become “real” scientists and troubleshoot their PCR problems.
Contamination Problems
If a band appears in the negative control (contamination) either one of your reagents or your pipettor is contaminated. Contamination can be difficult to ferret out. If you have time to figure out where it is occurring, first, clean your pipettor and discard your cheapest reagents. Try running your PCR again. If you continue to have contamination problems, or if you don’t have time to play detective, discard all your reagents and start again. Because contamination is potentially expensive and time-consuming it pays to aliquot all the expensive reagents you use, such as primers and dNTPs.
Restriction
Digest of Salmon PCR Product:
In this step, you will take your PCR product (in this case, the Gonadotropin
gene) and digest it with a restriction enzyme (BstNI) that we know cuts a site
that varies among individuals. This step is one of the easiest and most
satisfying if it works, because at the end of the digestion the students will
have data that they can analyze. There
are two alleles. BstN I cuts allele A twice and allele B three times. It
is a good exercise to ask students to try to draw what the expected gel would
look like. Click here to see a diagram of the
cut sites for Gonadotropin and other loci.
Also check out the “Data Analysis” section for information on how to
interpret the data. [Note that
BstN1 is unusual in that it works best at 60o C].
DAILY PREP:
Teachers
Advanced Preparation for Labs
(assuming
50 min. periods)
Day
1
Intro
talk
Day 2 Begin DNA extractions: Proteinase K digestions.
Objectives Prepare students to transfer tissue to fresh tube, rinse with distilled
water, and begin proteinase K digestion.
Prep 1) Set water bath to 55o C.
2) From DNeasy kit, take out bottles of ATL buffer and proteinase K.
Check ATL buffer to see if a precipitate has formed- if so, warm
the bottle at 55o for a minute or two. Aliquot enough ATL (200 ul per sample) for each lab group into a 1.7 ml eppendorf
tube (labeled on cap). Aliquot enough proteinase K (25 ul per sample) for each lab group into a labeled 0.5 ml eppendorf tube. These quantities are more than necessary, but allow for some pipetting error.
3) For each lab group (2 or 3 students), supply (on a tray if possible):
- one eppendorf rack with aliquots of ATL and proteinase K
- one p20 and one p200 pipettor
- one box of p20/200 pipettor tips
- small beaker
- one squirt bottle with dH20 (or tube of water with squeeze-bulb pipet)
- one permanent fine point marker (Sharpie- ultrafine point if possible)
4) Review the 3-step procedure for today.
a) rinsing of tissue with water and transfer into fresh labeled tube
b) addition of ATL buffer
c) addition of proteinase K
5) Hand out the tubes with the tissue samples to each student.
Tell students to use the Sharpie permanent felt marker to write the fish ID number on their fresh eppendorf tube. Also have students record their fish number(s) in their lab notebooks and on a master sheet that you circulate. They may then follow their protocols, ending with putting their tubes in the 55o C water bath.
Day 3 Finish DNA extraction
Objectives Complete DNA extraction protocol, ending with purified DNA in
clean labeled 1.7 ml eppendorf tube.
Prep 1) Set up table-top centrifuges and vortexes (if available).
2) Set water bath to 70o C.
3) From DNeasy kit, add the appropriate amounts of 95% ethanol to buffers AW1 and AW2 (indicated on labels of bottles).
4) Aliquot enough of each reagent for each lab group as follows into 1.7 ml eppendorf tubes. (Again, these amounts allow for some pipetting error).
a) 220 ul AL buffer per sample
b) 220 ul 95% ethanol
c) 550 ul buffer AW1
d) 550 ul buffer AW2
e) 220 ul buffer AE
5) Give each lab group:
- one eppendorf rack with enough of the above aliquots for their samples.
- one packaged minicolumn per sample.
- one fine-point permanent Sharpie marker
- one p200 pipettor
- one p1000 pipettor
- one box of tips for p200
- one box of tips for p1000
- one 1.7 ml eppendorf tube per sample
6) Tell students to remove minicolumn (already in collecting tube) from package, and use Sharpie marker to label the caps of their minicolumn with fish ID number. Have them put their labeled columns in their eppendorf rack with their samples lined up behind columns. Encourage this kind of organization, since it is easy to lose track of what’s what.
7) Review today’s procedure. Tell students that if all liquid does not come through column on any step, they can spin again at increased speed (up to 14,000 rpm). Remind students that they will be discarding the flow-through for all the steps except the last one. The liquid that comes through on the final step is their DNA! This should go into a labeled 1.7 ml eppendorf tube.
Day
4
DNA gels
Objectives Visualize DNA on agarose gels.
Prep 1) Make enough running buffer (TAE or TBE) by diluting 10X stock 1:10 with distilled water.
2) Prepare 1% agarose by mixing 1 g of agarose into 100 ml of running buffer. Heat in microwave until you cannot see any more little agarose blobs.
Cool the agarose in a tub of water until you can hold the bottle with your bare hands. It should feel very warm but not too hot to touch (about 55o C). You might want to make up the agarose well ahead of time and just keep it in a 55o water bath until ready to pour.
3) Make up a batch of 1 kb ladder mixed with the appropriate amount of loading dye. If you are using the ladder provided by GROWS, it is already mixed with dye: load 4 ul on gel- first lane of each row of wells.
4) Give each lab group:
- eppendorf rack with enough eppendorf tubes for their samples.
- p20 pipettor
- box of tips
- eppendorf tube with small amount of load dye (e.g. 10 ul)
- Sharpie marker
Students should run 10 ul of each DNA sample (plus 2 ul load dye).
5) Make a map of each gel and put it next to each gel box. Ask students to record their sample numbers on the gel map.
6) Gels can be stained with
ethidium bromide (5 ug/ml), or SYBR Green or SYBR Gold for 30 minutes, then
rinsed and photographed on UV light box.
If using Bio-Safe (from BioRad), make a concentrated stain by using a
1:200 ratio of stain to water. Stain
for 3 hours, then destain in water overnight.
Day 5 PCR round 1
Objectives Set up and run first round of PCR.
Prep 1) Set up PCR machines (thermal cyclers).
2) Two programs should be set on each machine:
a) 95/54-15 = first round
[95o 2 min. hold, then 15 cycles of:
95o, 15 sec., 54o 40 sec., 72o 1 min.20 sec., then
72o 5 min. hold, then 4o hold until shutoff]
b) 95/54-30 = second round. 30 cycles- times and temps as above
4) Thaw PCR reagents: 10X buffer, MgCl2, dNTPs, F1 and R1 primers.
(note: protocol is written for 5 mM dNTPs, so Qiagen dNTPs must be diluted in half with dH20 before use)
3) For each lab group, supply:
- one eppendorf rack with DNA samples
- one 0.2 ml thin-walled PCR tube per sample
- one p20 pipettor
- one p200 pipettor
- one box of pipette tips
- one fine tip Sharpie marker pen (black or blue)
4) Using student volunteers, make up one master mix for the whole class. Split it up into a few tubes so there isn’t a traffic jam trying to get to the master mix. Make enough mix for at least 4 extra reactions, to account for pipetting error. Also, include one PCR reaction that has no added DNA as control.
5) Let students take 23 ul master mix using p200 pipettor. Review the proper use of the p200 so you don’t run out of master mix. Students can then add 2 ul of their DNA to their reaction and put their tubes in the thermal cycler.
6) Make a map of the tube positions for each machine (put it next to the machine), and tell students to record their sample numbers on the map.
7) Choose thermal cycler file 95-54/15 and begin 15 cycle run. Simply push “run”, type in 25 for the volume, then “start.” Takes about 1 hr.
Day 6 PCR round 2
Objectives
Further amplify the PCR product from
round 1
Prep Follow set-up for PCR round 1, except:
1) use internal primers F1a and R1a
2) put out a different colored Sharpie pen (e.g. black for 1st round, and red for 2nd round)
3) students will take 2 ul from 1st round reactions and add then to 2nd round reactions
4) use the 95-54/30 file on thermal cycler for the 30 cycle run
Day 7 Set up 1% agarose gels for PCR round 2 product
Day 8 Restriction digests of PCR product
Objectives Cut the 2nd round PCR product with BstN1
Prep
1) Set up water bath to appropriate temperature (60oC for
gonadotropin/BstN1, 37o C for prolactin/Hinf1).
2) Thaw 10X
restriction buffer
3) Give each lab group:
- one eppendorf rack
- one 0.5 ml eppendorf tube per sample
- one p20 pipettor
- one box of pipette tips
- one fine tip Sharpie marker pen
4) Make master mix according to protocol. Take enzyme out of freezer for only enough time to get the amount needed, then return it to freezer. Make enough mix for a couple of extra tubes to allow for pipetting error.
5) Have students take 15 ul of master mix for each sample. They can then add
their second round PCR product (5
ul) and put in water bath. Spin
tubes in centrifuge after incubation, since the liquid evaporates to top of
tube!
Day 9
Set up 1.5% agarose gels for running digests.
Day 10 Analysis of results: Hardy-Weinberg Analysis, Comparison of Two Populations
Project
Description | Overview & Objectives | Teacher Prep | Protocols|
Useful References